Taking a family photo for next year’s Christmas card: how do I leave room?
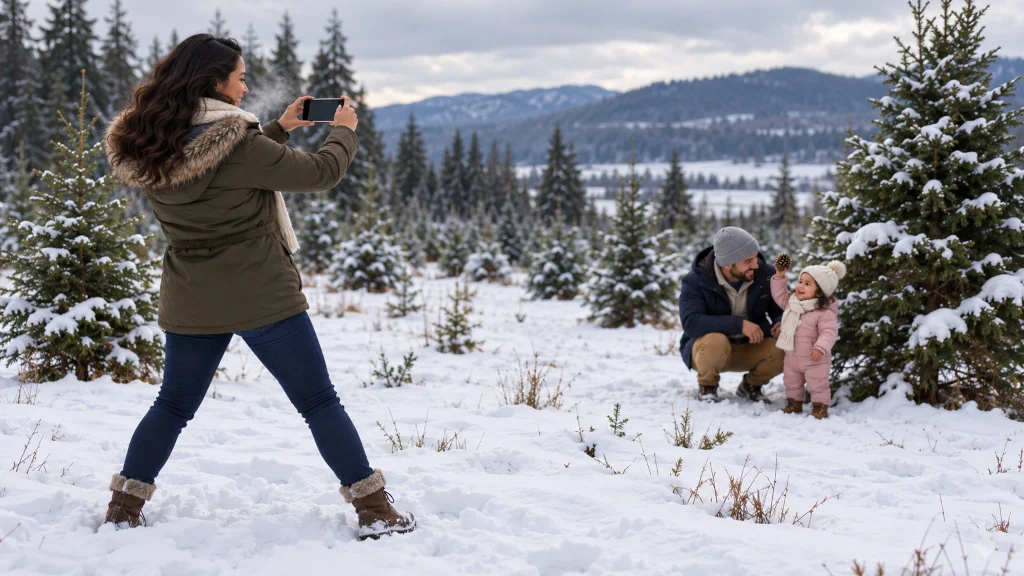
It is a cold Saturday at the tree farm.
Your partner is crouched in front of a fir with your daughter, who is eighteen months old and holding a pinecone like a trophy.
You raise the phone and frame them tight, faces filling the screen.
Then you remember last year’s card, and the half of the photo that never made it.
You take three steps back.
Now there is tree above them, snow at their feet, and room on both sides.
The easiest time to solve the half-picture problem is before the photo exists. Leaving room around the people gives a future card space to crop, trim and fit without losing anyone.
That small step answers part of a question many card senders ask: “How do you use a whole picture on a Christmas card? It’s only using half of our picture”
This article explores one part of the larger question: how to take a family photo with next year’s card in mind.
Key Takeaways
- A tightly framed photo leaves no room to adjust when it meets a card’s photo window.
- Leaving space around the people gives you room to crop and trim later.
- Taking both a wide and a closer version gives more layout choices.
- Taking one vertical and one horizontal version helps with different card designs.
- Testing the photo in a card layout soon after taking it leaves time to retake it.
Why a tight photo causes trouble later
A tightly framed photo looks wonderful on a phone.
Faces fill the screen. Nothing is wasted.
The trouble starts when it meets a card.
Card windows come in many shapes, and printers trim the edges.
If people already reach the edge of the photo, any crop or trim takes some of them with it.
Think of how a seamstress cuts fabric.
She always leaves a little extra beyond the line she will sew.
That margin is not waste. It is what lets the seam come out right.
Room around a photo works the same way.
Framing tight is not the same as framing for the card.
Five habits for a card-ready photo
These are practical habits drawn from how cards and printing work, not results from a study of card photos.
1. Leave room around the group
After framing the shot you want, step back a little.
Aim for some space above the heads, below the feet or hands, and on both sides.
2. Keep people away from the edges
Even in a wider shot, keep the people on the ends a little in from the side of the frame.
The ends are where both cropping and trimming happen first.
3. Take a wide version and a closer version
A wide version gives room for wide card windows and for background.
A closer version gives larger faces for small or square windows.
4. Take one vertical and one horizontal
Many card designs are horizontal. Some have vertical windows.
Having both means the photo fits whichever design you choose.
5. Keep the original files
Save the photos from the phone or camera that took them, not copies from a group text or a post.
Originals keep their full detail and full edges.
Even light helps too. Faces in soft, even light tend to print more clearly than faces half in shadow.
Test it while you can still retake it
The best time to discover a problem is the same week the photo was taken.
Once you have a favorite, place it into a card design or two.
Look at who stays in the window, and whether anyone sits near an edge.
If something does not work, there may still be time to take another photo while everyone is together and the light is the same.
That is much easier than discovering the problem in December.
Practical Takeaways
- Frame the shot, then step back.
- Keep the people on the ends a little in from the sides.
- Take wide and close, vertical and horizontal.
- Keep the originals in one folder.
- Try the photo in a card layout the same week you take it.
Conclusion
This article does not cover every part of using a whole picture on a card.
It answers one part of the question: how to take next year’s photo so the card does not have to cut anyone out.
The final article in this series brings all the pieces together into one plan.
A little extra room costs nothing when you take the photo.
Leave room around the edges for next December.
Start With Everyday Snapshots
If planning next year’s group photo already sounds like a project, a Hawkes’ Impossible Portraits holiday card starts somewhere else. You upload a photo of each person, ordinary snapshots work best when the lighting is reasonably even, and the scene is composed around your family, so no single group picture has to fit a card window. Want someone in their own clothes? A head-to-toe photo of them makes that possible. Every portrait gets an automatic identity check. Premium folded 7×5 cards on heavyweight 130 lb silk-coated stock with premium envelopes, in Christmas, Hanukkah and Kwanzaa scenes. See the before-to-after examples.
FAQ
How do I take a family photo that will fit a Christmas card?
Leave space around the group, keep people away from the edges, and take both wide and close versions in both orientations.
Should I take Christmas card photos vertical or horizontal?
Take both. Many card designs are horizontal, but some have vertical photo windows.
Why does leaving space around people help?
Card windows come in different shapes and printers trim the edges. Spare space can be cropped or trimmed without losing anyone.
When should I test the photo on a card?
As soon as possible after taking it, while there is still time to retake it.
This Article Is Part Of A Larger Series
Question: How do you use a whole picture on a Christmas card? It’s only using half of our picture
Current article: Article 12 of 13 – Late series
This article explores one evidence-supported aspect of the larger question.
Readers interested in the full answer should explore the complete series.